Earlier, we described how to use CrystaX NDK in Android Studio.
Since that time Google announced a new (experimental) Gradle plug-in supporting NDK
in Android Studio. Let's see how to use CrystaX NDK with this new plug-in.
To be consistent, we'll remaster the previous article with new conditions - i.e., this will
again be a simple UI application where Boost.Serialization would be used. Using Boost is not
necessary for understanding the new work scheme with the Gradle experimental plug-in; however,
we've included Boost examples just to cover more use cases.
In the new Gradle plug-in, Google gave up on the old GNU Make-based build system (ndk-build).
Now, Gradle's DSL used to describe every aspect of build process. It's good news for those who
are not familiar with old-school GNU Make, and who want to do everything in IDE, asking IDE to
manage the build process fully and not worrying about GNU Make files.
However, this approach has some drawbacks. The most important one is that, in this case, the
developer is more involved in building the build file in Gradle DSL, and should know Groovy as well.
So let's see how it works.
Java part
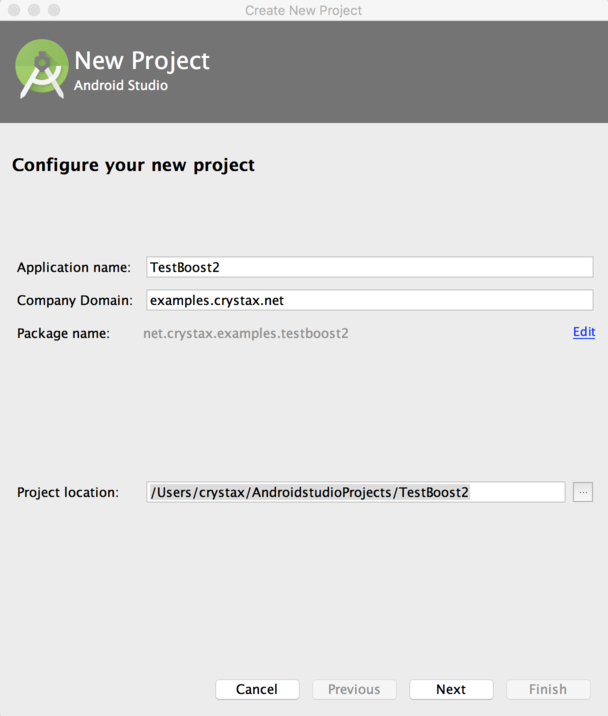
First off, open Android Studio and create a new Android project there:
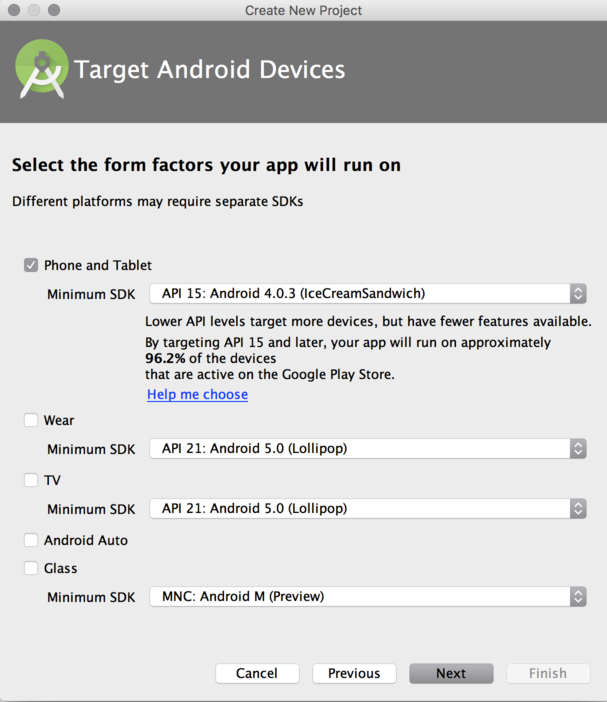
Select "Android 4.0.3" target:
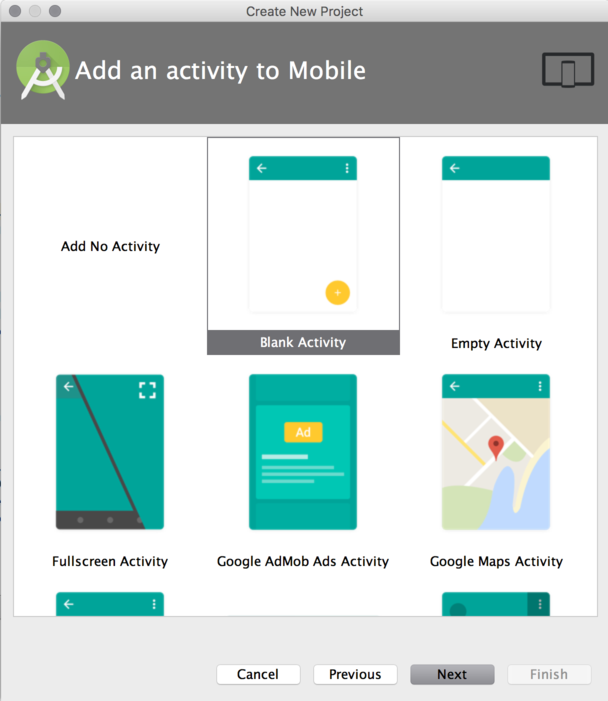
Select blank activity:
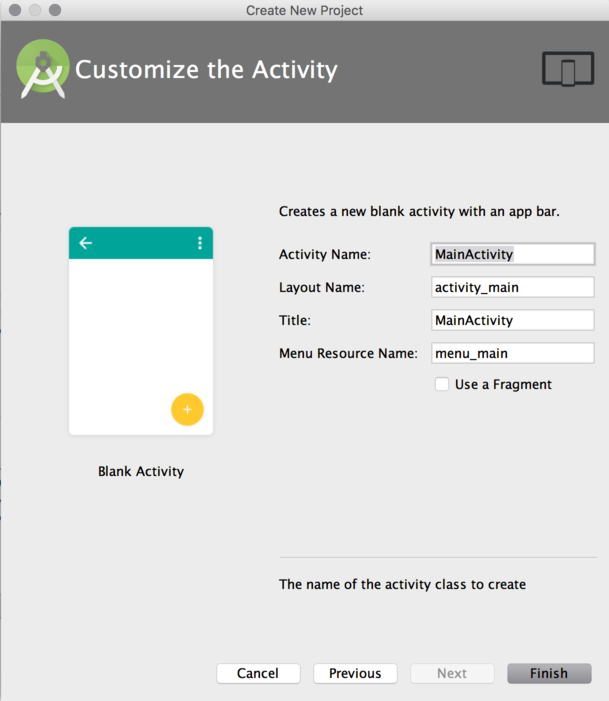
Accept default names and press the "Finish" button:
Gradle
By default, Android Studio still uses the old Gradle plug-in. Let's switch to the new one (experimental).
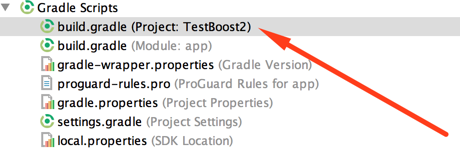
First off, open and edit several files:
build.gradle.diff
diff --git a/build.gradle b/build.gradle
index e0b366a..a4d7068 100644
--- a/build.gradle
+++ b/build.gradle
@@ -5,7 +5,7 @@ buildscript {
         jcenter()
     }
     dependencies {
-        classpath 'com.android.tools.build:gradle:1.5.0'
+        classpath 'com.android.tools.build:gradle-experimental:0.3.0-alpha7'

         // NOTE: Do not place your application dependencies here; they belong
         // in the individual module build.gradle files
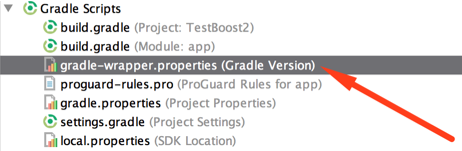
gradle/wrapper/gradle-wrapper.properties.diff
diff --git a/gradle/wrapper/gradle-wrapper.properties b/gradle/wrapper/gradle-wrapper.properties
index f23df6e..bfcae0a 100644
--- a/gradle/wrapper/gradle-wrapper.properties
+++ b/gradle/wrapper/gradle-wrapper.properties
@@ -3,4 +3,4 @@ distributionBase=GRADLE_USER_HOME
 distributionPath=wrapper/dists
 zipStoreBase=GRADLE_USER_HOME
 zipStorePath=wrapper/dists
-distributionUrl=https\://services.gradle.org/distributions/gradle-2.8-all.zip
+distributionUrl=https\://services.gradle.org/distributions/gradle-2.6-all.zip
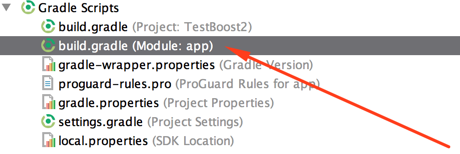
app/build.gradle.diff
diff --git a/app/build.gradle b/app/build.gradle
index 3fd571b..d9b2bf0 100644
--- a/app/build.gradle
+++ b/app/build.gradle
@@ -1,20 +1,23 @@
-apply plugin: 'com.android.application'
+apply plugin: 'com.android.model.application'

-android {
-    compileSdkVersion 23
-    buildToolsVersion "23.0.2"
+model {
+    android {
+        compileSdkVersion = 23
+        buildToolsVersion = "23.0.2"

-    defaultConfig {
-        applicationId "net.crystax.examples.testboost2"
-        minSdkVersion 15
-        targetSdkVersion 23
-        versionCode 1
-        versionName "1.0"
+        defaultConfig.with {
+            applicationId = "net.crystax.testboost2"
+            minSdkVersion.apiLevel = 15
+            targetSdkVersion.apiLevel = compileSdkVersion.asType(Integer)
+            versionCode = 1
+            versionName = "1.0"
+        }
     }
-    buildTypes {
+
+    android.buildTypes {
         release {
-            minifyEnabled false
-            proguardFiles getDefaultProguardFile('proguard-android.txt'), 'proguard-rules.pro'
+            minifyEnabled = false
+            proguardFiles += file('proguard-rules.pro')
         }
     }
 }
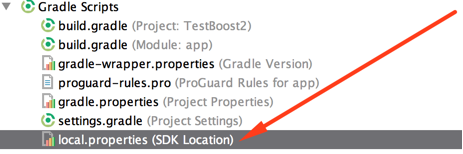
Now, we need to open local.properties and add the path to the CrystaX NDK, like below:
sdk.dir=/opt/android/android-sdk-mac
ndk.dir=/opt/android/crystax-ndk-10.3.1
For Windows users, backslashes and colons in the path should be escaped:
sdk.dir=C\:\\android\\android-sdk-mac
ndk.dir=C\:\\android\\crystax-ndk-10.3.1
And sync gradle changes:

Layout
Now, modify app/res/layout/content_main.xml so it looks like the following:
content_main.xml.diff
diff --git a/app/src/main/res/layout/content_main.xml b/app/src/main/res/layout/content_main.xml
index ec3933f..077dacc 100644
--- a/app/src/main/res/layout/content_main.xml
+++ b/app/src/main/res/layout/content_main.xml
@@ -13,7 +13,9 @@
     tools:showIn="@layout/activity_main">

     <TextView
+        android:id="@+id/text"
         android:layout_width="wrap_content"
         android:layout_height="wrap_content"
-        android:text="Hello World!" />
+        />
+
 </RelativeLayout>
content_main.xml
<?xml version="1.0" encoding="utf-8"?>
<RelativeLayout xmlns:android="http://schemas.android.com/apk/res/android"
    xmlns:app="http://schemas.android.com/apk/res-auto"
    xmlns:tools="http://schemas.android.com/tools"
    android:layout_width="match_parent"
    android:layout_height="match_parent"
    android:paddingBottom="@dimen/activity_vertical_margin"
    android:paddingLeft="@dimen/activity_horizontal_margin"
    android:paddingRight="@dimen/activity_horizontal_margin"
    android:paddingTop="@dimen/activity_vertical_margin"
    app:layout_behavior="@string/appbar_scrolling_view_behavior"
    tools:context="net.crystax.examples.testboost2.MainActivity"
    tools:showIn="@layout/activity_main">

    <TextView
        android:id="@+id/text"
        android:layout_width="wrap_content"
        android:layout_height="wrap_content"
        />

</RelativeLayout>
MainActivity
Add the following lines into your MainActivity.onCreate():
TextView field = (TextView)findViewById(R.id.text);
field.setText(getGPSCoordinates(getFilesDir().getAbsolutePath()));
Add declaration of native method into MainActivity class:
private native String getGPSCoordinates(String rootPath);
Also, don't forget to add loading of the native library to the static initialization block:
static {
    System.loadLibrary("test-boost2");
}
Here is diff:
MainActivity.java.diff
diff --git a/app/src/main/java/net/crystax/examples/testboost2/MainActivity.java b/app/src/main/java/net/crystax/examples/testboost2/MainActivity.java
index f9c0821..0519122 100644
--- a/app/src/main/java/net/crystax/examples/testboost2/MainActivity.java
+++ b/app/src/main/java/net/crystax/examples/testboost2/MainActivity.java
@@ -8,9 +8,16 @@ import android.support.v7.widget.Toolbar;
 import android.view.View;
 import android.view.Menu;
 import android.view.MenuItem;
+import android.widget.TextView;

 public class MainActivity extends AppCompatActivity {

+    static {
+        System.loadLibrary("test-boost2");
+    }
+
+    private native String getGPSCoordinates(String rootPath);
+
     @Override
     protected void onCreate(Bundle savedInstanceState) {
         super.onCreate(savedInstanceState);
@@ -26,6 +33,9 @@ public class MainActivity extends AppCompatActivity {
                         .setAction("Action", null).show();
             }
         });
+
+        TextView field = (TextView) findViewById(R.id.text);
+        field.setText(getGPSCoordinates(getFilesDir().getAbsolutePath()));
     }

     @Override
Final content of MainActivity.java should be as below:
MainActivity.java
package net.crystax.examples.testboost2;

import android.os.Bundle;
import android.support.design.widget.FloatingActionButton;
import android.support.design.widget.Snackbar;
import android.support.v7.app.AppCompatActivity;
import android.support.v7.widget.Toolbar;
import android.view.View;
import android.view.Menu;
import android.view.MenuItem;
import android.widget.TextView;

public class MainActivity extends AppCompatActivity {

    static {
        System.loadLibrary("test-boost2");
    }

    private native String getGPSCoordinates(String rootPath);

    @Override
    protected void onCreate(Bundle savedInstanceState) {
        super.onCreate(savedInstanceState);
        setContentView(R.layout.activity_main);
        Toolbar toolbar = (Toolbar) findViewById(R.id.toolbar);
        setSupportActionBar(toolbar);

        FloatingActionButton fab = (FloatingActionButton) findViewById(R.id.fab);
        fab.setOnClickListener(new View.OnClickListener() {
            @Override
            public void onClick(View view) {
                Snackbar.make(view, "Replace with your own action", Snackbar.LENGTH_LONG)
                        .setAction("Action", null).show();
            }
        });

        TextView field = (TextView)findViewById(R.id.text);
        field.setText(getGPSCoordinates(getFilesDir().getAbsolutePath()));
    }

    @Override
    public boolean onCreateOptionsMenu(Menu menu) {
        // Inflate the menu; this adds items to the action bar if it is present.
        getMenuInflater().inflate(R.menu.menu_main, menu);
        return true;
    }

    @Override
    public boolean onOptionsItemSelected(MenuItem item) {
        // Handle action bar item clicks here. The action bar will
        // automatically handle clicks on the Home/Up button, so long
        // as you specify a parent activity in AndroidManifest.xml.
        int id = item.getItemId();

        //noinspection SimplifiableIfStatement
        if (id == R.id.action_settings) {
            return true;
        }

        return super.onOptionsItemSelected(item);
    }
}
We have finished with the Java part of the application; let's switch to the native part now.
Native part
First we enable native build in the app/build.gradle:
app/build.gradle.diff
diff --git a/app/build.gradle b/app/build.gradle
index d9b2bf0..4debb04 100644
--- a/app/build.gradle
+++ b/app/build.gradle
@@ -14,6 +14,15 @@ model {
         }
     }

+    android.ndk {
+        moduleName = "test-boost2"
+        cppFlags += "-std=c++11"
+        cppFlags += "-fexceptions"
+        cppFlags += "-frtti"
+        stl = "gnustl_shared"
+    }
+
     android.buildTypes {
         release {
             minifyEnabled = false
Then open MainActivity.java and add implementation of the native method:
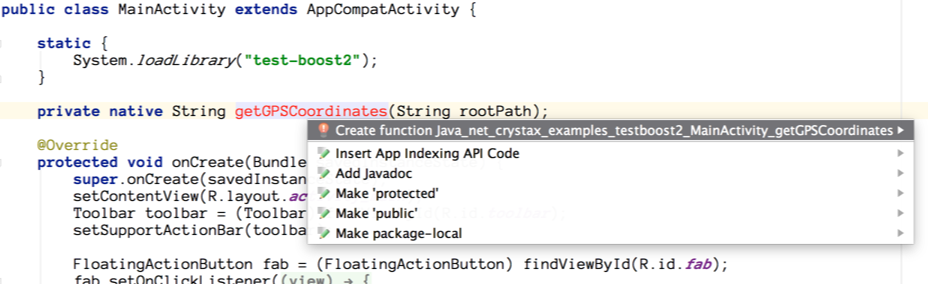
This will create file app/src/main/jni/test-boost2.c. Now, rename it to the app/src/main/jni/test.cpp,
and add two more files: app/src/main/jni/gps.hpp and app/src/main/jni/gps.cpp.
app/src/main/jni/gps.hpp
#ifndef GPS_HPP_7D5AF29629F64210BE00F3AF697BA650
#define GPS_HPP_7D5AF29629F64210BE00F3AF697BA650

#include <string>

// include headers that implement a archive in simple text format
#include <boost/archive/text_oarchive.hpp>
#include <boost/archive/text_iarchive.hpp>

/////////////////////////////////////////////////////////////
// gps coordinate
//
// illustrates serialization for a simple type
//
class gps_position
{
private:
    friend class boost::serialization::access;
    friend std::ostream &operator<<(std::ostream &, gps_position const &);
    // When the class Archive corresponds to an output archive, the
    // & operator is defined similar to <<.  Likewise, when the class Archive
    // is a type of input archive the & operator is defined similar to >>.
    template<class Archive>
    void serialize(Archive & ar, const unsigned int version)
    {
        ar & degrees;
        ar & minutes;
        ar & seconds;
    }
    int degrees;
    int minutes;
    float seconds;
public:
    gps_position(){}
    gps_position(int d, int m, float s) :
            degrees(d), minutes(m), seconds(s)
    {}

    bool operator==(gps_position const &g) const
    {
        return degrees == g.degrees &&
               minutes == g.minutes &&
               seconds == g.seconds;
    }

    bool operator!=(gps_position const &g) const
    {
        return !(*this == g);
    }
};

void save(std::string const &root, gps_position const &g);
void load(std::string const &root, gps_position &g);

#endif // GPS_HPP_7D5AF29629F64210BE00F3AF697BA650
app/src/main/jni/gps.cpp
#include <fstream>

#include "gps.hpp"

const char *FILENAME = "gps.dat";

std::ostream &operator<<(std::ostream &s, gps_position const &g)
{
    s << "GPS(" << g.degrees << "/" << g.minutes << "/" << g.seconds << ")";
    return s;
}

void save(std::string const &root, gps_position const &g)
{
    // create and open a character archive for output
    std::ofstream ofs(root + "/" + FILENAME);
    boost::archive::text_oarchive oa(ofs);
    // write class instance to archive
    oa << g;
    // archive and stream closed when destructors are called
}

void load(std::string const &root, gps_position &g)
{
    // create and open an archive for input
    std::ifstream ifs(root + "/" + FILENAME);
    boost::archive::text_iarchive ia(ifs);
    // read class state from archive
    ia >> g;
    // archive and stream closed when destructors are called
}
app/src/main/jni/test.cpp
#include <jni.h>

#include <string.h>
#include <stdlib.h>

#include <string>
#include <exception>
#include <sstream>

#include <android/log.h>

#define LOG(fmt, ...) __android_log_print(ANDROID_LOG_INFO, "TEST-BOOST", fmt, ##__VA_ARGS__)

#include "gps.hpp"

std::string gps(std::string const &root)
{
    const gps_position g(35, 59, 24.567f);
    save(root, g);

    gps_position newg;
    load(root, newg);

    std::ostringstream ostr;

    if (g != newg)
    return std::string();

    ostr << "GPS coordinates: " << newg;
    return ostr.str();
}

extern "C"
jstring
Java_net_crystax_examples_testboost2_MainActivity_getGPSCoordinates( JNIEnv* env,
                                                                    jobject thiz,
                                                                    jstring rootPath )
{
    const char *s = env->GetStringUTFChars(rootPath, 0);
    std::string root(s);
    env->ReleaseStringUTFChars(rootPath, s);
    LOG("root: %s", root.c_str());

    try {
        std::string ret = gps(root);
        return env->NewStringUTF(ret.c_str());
    }
    catch (std::exception &e) {
        LOG("ERROR: %s", e.what());
        abort();
    }
    catch (...) {
        LOG("Unknown error");
        abort();
    }
}
Finally, we inject new tasks and helper functions to the app/build.gradle:
app/build.gradle.diff
diff --git a/app/build.gradle b/app/build.gradle
index 3da6874..b5642f9 100644
--- a/app/build.gradle
+++ b/app/build.gradle
@@ -1,5 +1,10 @@
+import org.gradle.internal.os.OperatingSystem;
+
 apply plugin: 'com.android.model.application'

+final APP_ABIS = ["armeabi", "armeabi-v7a", "x86"]
+final BOOST_SHARED_LIBS = ["boost_serialization"]
+
 model {
     android {
         compileSdkVersion = 23
@@ -15,10 +20,14 @@ model {
     }

     android.ndk {
+        toolchain = "gcc"
+        toolchainVersion = "5"
         moduleName = "test-boost2"
         cppFlags += "-std=c++11"
         cppFlags += "-fexceptions"
         cppFlags += "-frtti"
+        cppFlags += "-I" + getBoostIncDir()
+        ldLibs.addAll BOOST_SHARED_LIBS
         ldLibs += "log"
         stl = "gnustl_shared"
     }
@@ -29,6 +38,62 @@ model {
             proguardFiles += file('proguard-rules.pro')
         }
     }
+
+    android.productFlavors {
+        APP_ABIS.each { abi ->
+            create(getFlavorName(abi)) {
+                ndk.with {
+                    abiFilters += abi
+                    getPrebuiltLibPaths(abi).each { path ->
+                        ldFlags += "-L" + path
+                    }
+                }
+            }
+        }
+    }
+}
+
+tasks.all {
+    task ->
+        if (task.name.startsWith('link')) {
+            task.dependsOn copyNativeLibs, stripNativeLibs
+        }
+}
+
+task copyNativeLibs {
+    ["debug", "release"].each { buildType ->
+        APP_ABIS.each { abi ->
+            def libs = [:]
+            BOOST_SHARED_LIBS.each { name ->
+                libs[name] = "${getBoostLibDir(abi)}/lib${name}.so"
+            }
+            libs.crystax = getLibCrystax(abi)
+
+            libs.each { name, file ->
+                dependsOn tasks.create(name: "copy-native-library-${name}-${abi}-${buildType}", type: Copy) {
+                    from file
+                    into getTargetLibDir(abi, buildType)
+                }
+            }
+        }
+    }
+}
+
+task stripNativeLibs(dependsOn: copyNativeLibs) {
+    ["debug", "release"].each { buildType ->
+        APP_ABIS.each { abi ->
+            def libs = []
+            libs.addAll(BOOST_SHARED_LIBS)
+            libs += "crystax"
+
+            libs.each { name ->
+                dependsOn tasks.create(name: "strip-native-library-${name}-${abi}-${buildType}", type: Exec) {
+                    commandLine getStripExecutable(abi), "--strip-unneeded", "${getTargetLibDir(abi, buildType)}/lib${name}.so"
+                }
+            }
+
+        }
+    }
 }

 dependencies {
@@ -37,3 +102,152 @@ dependencies {
     compile 'com.android.support:appcompat-v7:23.1.1'
     compile 'com.android.support:design:23.1.1'
 }
+
+def getNdkDir() {
+    if (System.env.ANDROID_NDK_ROOT != null)
+        return System.env.ANDROID_NDK_ROOT
+
+    Properties properties = new Properties()
+    properties.load(project.rootProject.file('local.properties').newDataInputStream())
+    def ndkdir = properties.getProperty('ndk.dir', null)
+    if (ndkdir == null)
+        throw new GradleException("""\
+                NDK location not found.
+                Define location with ndk.dir in the local.properties file
+                or with an ANDROID_NDK_ROOT environment variable.""")
+
+    return ndkdir
+}
+
+def getCrystaxNdkDir() {
+    def ndkDir = getNdkDir()
+    if (!(new File(ndkDir, "sources/crystax").exists()))
+        throw new GradleException("""\
+            '${ndkDir}' is not a CrystaX NDK.
+            Edit ndk.dir in local.properties or set ANDROID_NDK_ROOT
+            environment variable pointing to CrystaX NDK""")
+
+    return ndkDir
+}
+
+def getFlavorName(abi) {
+    switch (abi) {
+        case "armeabi":
+            return "arm";
+        case "armeabi-v7a":
+            return "arm7"
+        case "arm64-v8a":
+            return "arm64"
+        default:
+            return abi.replaceAll('-', '_')
+    }
+}
+
+def getToolchainName(abi) {
+    switch (abi) {
+        case ~/^armeabi.*/:
+            return "arm-linux-androideabi"
+        case ~/^arm64.*/:
+            return "aarch64-linux-android"
+        case "mips":
+            return "mipsel-linux-android"
+        case "mips64":
+            return "mips64el-linux-android"
+        case ["x86", "x86_64"]:
+            return abi
+        default:
+            throw new GradleException("Unsupported ABI: '${abi}'")
+    }
+}
+
+def getToolchainPrefix(abi) {
+    switch (abi) {
+        case ~/^armeabi.*/:
+            return "arm-linux-androideabi"
+        case ~/^arm64.*/:
+            return "aarch64-linux-android"
+        case "mips":
+            return "mipsel-linux-android"
+        case "mips64":
+            return "mips64el-linux-android"
+        case "x86":
+            return "i686-linux-android"
+        case "x86_64":
+            return "x86_64-linux-android"
+        default:
+            throw new GradleException("Unsupported ABI: '${abi}'")
+    }
+}
+
+def getHostOS() {
+    if (OperatingSystem.current().isLinux())
+        return "linux"
+    if (OperatingSystem.current().isMacOsX())
+        return "darwin"
+    if (OperatingSystem.current().isWindows())
+        return "windows"
+    throw new GradleException("Unsupported host OS")
+}
+
+def getHostArch() {
+    def arch = System.getProperty("os.arch")
+    switch (arch) {
+        case ["x86_64", "amd64"]:
+            return "x86_64"
+        case ~/^i[3456]86/:
+        case "x86":
+            return "x86"
+        default:
+            throw new GradleException("Can't detect host's CPU architecture: '${arch}'")
+    }
+}
+
+def getHostTag() {
+    def tag = getHostOS()
+    def arch = getHostArch()
+    if (tag != "windows" || arch != "x86")
+        tag += "-${arch}"
+    return tag
+}
+
+def getStripExecutable(abi) {
+    def ndk = getCrystaxNdkDir()
+    def toolchainName = getToolchainName(abi)
+    def toolchainPrefix = getToolchainPrefix(abi)
+    def hostTag = getHostTag()
+    def strip = "${ndk}/toolchains/${toolchainName}-5/prebuilt/${hostTag}/bin/${toolchainPrefix}-strip"
+    if (OperatingSystem.current().isWindows())
+        strip = strip.replaceAll('/', '\\\\') + '.exe'
+    return strip
+}
+
+def getPrebuiltLibPaths(abi) {
+    def paths = []
+    paths += getBoostLibDir(abi)
+    paths += getLibCrystaxDir(abi)
+    return paths
+}
+
+def getTargetLibDir(abi, buildType) {
+    return "${buildDir}/intermediates/binaries/${buildType}/${getFlavorName(abi)}/lib/${abi}"
+}
+
+def getLibCrystaxDir(abi) {
+    return "${getCrystaxNdkDir()}/sources/crystax/libs/${abi}"
+}
+
+def getLibCrystax(abi) {
+    return "${getLibCrystaxDir(abi)}/libcrystax.so"
+}
+
+def getBoostDir() {
+    return "${getCrystaxNdkDir()}/sources/boost/1.59.0"
+}
+
+def getBoostIncDir() {
+    return "${getBoostDir()}/include"
+}
+
+def getBoostLibDir(abi) {
+    return "${getBoostDir()}/libs/${abi}/gnu-5"
+}
File tree
The source file tree of the TestBoost2/app folder should look like the following:
.
├── app.iml
├── build.gradle
├── libs
├── proguard-rules.pro
└── src
    ├── androidTest
    │   └── java
    │       └── net
    │           └── crystax
    │               └── examples
    │                   └── testboost2
    │                       └── ApplicationTest.java
    ├── main
    │   ├── AndroidManifest.xml
    │   ├── java
    │   │   └── net
    │   │       └── crystax
    │   │           └── examples
    │   │               └── testboost2
    │   │                   └── MainActivity.java
    │   ├── jni
    │   │   ├── gps.cpp
    │   │   ├── gps.hpp
    │   │   └── test.cpp
    │   └── res
    │       ├── drawable
    │       ├── layout
    │       │   ├── activity_main.xml
    │       │   └── content_main.xml
    │       ├── menu
    │       │   └── menu_main.xml
    │       ├── mipmap-hdpi
    │       │   └── ic_launcher.png
    │       ├── mipmap-mdpi
    │       │   └── ic_launcher.png
    │       ├── mipmap-xhdpi
    │       │   └── ic_launcher.png
    │       ├── mipmap-xxhdpi
    │       │   └── ic_launcher.png
    │       ├── mipmap-xxxhdpi
    │       │   └── ic_launcher.png
    │       ├── values
    │       │   ├── colors.xml
    │       │   ├── dimens.xml
    │       │   ├── strings.xml
    │       │   └── styles.xml
    │       ├── values-v21
    │       │   └── styles.xml
    │       └── values-w820dp
    │           └── dimens.xml
    └── test
        └── java
            └── net
                └── crystax
                    └── examples
                        └── testboost2
                            └── ExampleUnitTest.java
Final result
That's it! Now build the project as usual (Build -> Make Project) and run it on the device.
Here is a screenshot of the running application:

Sample project
To make it easier, we've uploaded a ready-to-use project to
GitHub.
Check it out and enjoy!
